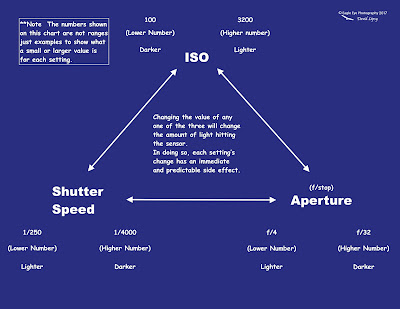
In Part-1 I discussed the basic camera settings. Here in Part-2 I am going to be concentrating on the three main settings you will use in manual when shooting. The BIG 3; ISO, Shutter speed & Aperture. These are all interconnected. Change one and you lighten or darken the image.
The important thing to remember when
lightening your image is that each of these has an immediate and predictable side effect.
 |
| Click on image to read full sized |
ISO
Raise the ISO, and depending on the camera body, you will soon reach a point where the image is very noisy.
 |
| American Wigeon - Exeter WWTP - Exeter, NH 09-23-16 |
Noise is the digital equivalent of grainy in film images. There is not enough digital data to properly fill in all the pixels, so it leaves a lot of 'holes' in the image. This occurs most in the darker areas.
In the image above, it was a dark day and getting late. I knew it was going to be a noisy shot, but I wanted to try anyway.
When editing a noisy image, there are items in many programs that can help smooth over the noise, but it can only go so far. It will also take away the crispness of the shot.
(Shutter Speed)
Lower the shutter speed and you will soon reach a point where any movement of the subject or shake by you will result in a blurred image.
In future discussions, you will see that sometimes I like to lower the speed to get blur in the wingtips of birds in flight. The speed needed will change based on species. Think how fast a ducks wingtips are moving verses the tips of a Bald Eagle!
 |
| Common & Barrow's Goldeneye Fly Upriver - Merrimack River - Manchester, NH 01-11-16 |
Note the wingtips on most of these Goldeneye. The blur gives a sense of motion to the shot. If you catch a birds wings at the high or low point, for a fraction of a second it slows down then reverses, thus will most likely not produce the blur wanted.
(Aperture - f/stop)
Changing the aperture, or f/stop to a lower number will tighten up your DOF (Depth of Field), possibly coming to a point where your subject is blurry on the back half. Or both in front and behind.
Think of DOF as being 2 huge panes of glass. The smaller the number, the wider the aperture of the lens opens up letting in more light, but brings those 2 panes of glass very close together. Anything outside those panes will not be in focus.
As you adjust to a larger f/stop, the aperture of the lens begins to close down and the panes of glass begin to move away from each other, thus giving you a WIDER DOF.
I like to shoot with a tight DOF, but sometimes I need to change this to get the shot; to me it's better than noise and better than a blurry image.
 |
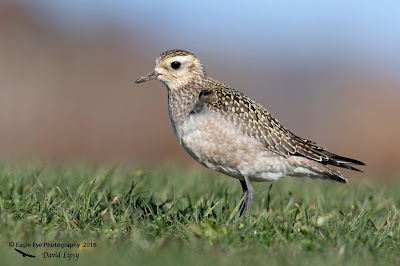
| American Golden-Plover - Rye Harbor State Park - Rye, NH 11-11-16 |
Take a close look at the image above this. What do you notice about the bird? Its tail feathers are not in focus. When I shoot birds, I always target the eye. This bird is around 10-1/2" long. Since I am targeting the eye, half of the focal plane will be in front of the eye, and half behind it.
For this discussion, lets assume that half of the bird is in focus. Since we know the bird is 10-1/2", we can say that the DOF at the settings for this image is 10-1/2". 5-1/4" in front of the eye, and 5-1/4" behind it.
 |
| American Golden-Plover - Rye Harbor State Park - Rye, NH 11-11-16 |
Take a close look at the image above this. What do you notice about the bird now? The entire bird is in focus. I did not change any settings from the last image to this one. The only difference is that the bird turned. When it was parallel to end glass of the lens I took the shot. The entire bird is in focus because I was able to catch an image with the entire bird in the focal plane.
Notice the grass in the two images; you can see that the grass in front as well as everything behind the bird is out of focus.
If I had needed to lighten up the shot, and chose to use a smaller f/stop (Wider aperture thru the lens), the glass panes would have moved even closer together. Less of the bird in the top of these two images would be in focus. In both images, the grass in focus would be less as well.
(Viewer Display & The Key To MANUAL)
I would like you to practice adjusting the three settings while holding the camera up to your face. Use the information in the cameras view finder to watch the selection as you adjust.
You should practice this often, until you are able to adjust all three just by thinking about it.
The key to all of this, and to me the Key To MANUAL is the center section which is a light meter.
Every camera is different, even within manufacturers.
The above viewer display I took from my Canon 5D Mark III. Regardless of what is located where, you should have an indicator for the big three settings and a light meter.
(Sweet Spot)
When I get to a location, the first thing I do is look at the conditions. If its a nice sunny day, I set the camera to what I consider my sweet spot.
ISO 400, f/6.3, 1/2500th Sec.
Once these are set I put the camera to my face, depress the trigger halfway then point the lens all over while watching the light meter. There is a line in the above diagram under the number 1. This is the light indicator. It moves across the meter telling you where your lighting is before you take the shot. Sometimes it's not there... usually because I need to brighten as the indicator is off the chart to the left (-) side. With nothing but a protection filter on my lens, I want the light to be around -1, which is where I put the indicator in my diagram. I noticed in a recent field experiment, that when I added a polarizing filter, the images I liked best were taken when the meter was at 0 for the same settings.
When I am done searching out the highs and lows of light in the areas I think I might shoot towards, I point the lens at the darkest area. If it registers say, a -2 1/2, I might reduce the shutter speed to 2000. That might have helped a bit. If not, I would allow this to go down to the next value, 1600. I don't want to go any lower. I'm still not light enough so what do I do? Adjust the f/stop to a smaller number. If I am shooting my 500mm, which is an f/4, I would have a few values to go before I hit f/4. If I hit f/4 and it's still not bright enough, I need to stop and asses the situation. What am I shooting here... or at least hoping to shoot. If I believe I am in an area to capture a big ole' Bald Eagle lumbering along above a river, I might allow 2 more values removed on the shutter speed which would bring it down to 1000. If that does not do it, I will then, and only then (usually), I will reach for the ISO. While it would have been easier to just adjust the ISO, which is what the camera algorithms would have done, it might have required going up to ISO 2500, 3200 or even 4000. In this particular case, with the 5D Mark III, I would still take the shot at 4000, but try to stay at least 3200 or lower. The 5D III is awesome dealing with noise.
On one of my other cameras, a Canon 7D Mark II, when I got to the point where I had to adjust the ISO, I would not bring it up over 800. I will shoot 1000, but not comfortably. Anything more and you will have noise in your image. I would say that this is going to be what you face as most of us have crop frame cameras for birding.
The 5D III is a full frame machine that rocks in so many ways. FPS (frames per second) is not one of them. I also loose the 1.6x built in multiplier when using 'L' Series glass that all Canon crop frame cameras have. I use this body for everything except birding.
Once I have this set up, I have a good starting point. If a Bald Eagle flies by, well, I had better hope I didn't mess up my settings because I don't have time to adjust to the BIF before I fire as I want a shot of it heading inbound. I will however glance down at the light meter... if it is past 0+, or lower than 1-, I will adjust the shutter or aperture and hope I can still get off a few frames on the face of the bird.
And thats it! You will quickly get used to shooting this way and wonder how you ever managed a good image before.
There are many other ways to get a great image... but this is what I consider to be the best option.
MANUAL; Yeah...... I got that.


