Monday, April 26, 2021

Quick Tip #5 [AI ENHANCEMENT] - A New And Exciting Birding Photographers Tool by Adobe.

Adobe Camera Raw Version 13.2 has a new function sure to please all of you that wish you had more glass.

Adobe has created something they call AI Enhancement.  In essence, it is like adding a 2X multiplier to your lens, but without the 2-stop loss of light. It enlarges your images without ANY loss of clarity. It does NOT change your image in any way, it simply brings those many images we take are are a bit too far away and makes them keepers.


This link will take you to Adobe's website that explains the details of this fabulous new tool.  

Adobe Camera Raw - AI Enhancement


Here is an example using a recent image I took of a far away 2nd Year Bald Eagle.


The image size is 1600 x 1067 Pixels.  This bird was far in the distance, but I was able to capture a relatively clear image.  My EXIF Data on the image is:

2nd Year Bald Eagle
Auburn, WA, USA 04-16-21

Canon EOS 7D Mark II, EF 500mm f/4L IS II USM
ISO 250, f/5.6, 1/3200th Sec., (EFL) 800mm.
Hand Held. Cropped for Composition.
Manual Mode, Partial Metering, Auto White Balance.
Edit Flow: Selected and previewed in Adobe Bridge, Adobe Camera Raw, with final editing in Photoshop.


I started from the beginning for this next image.  After bringing it into Adobe Camera Raw from Adobe Bridge, I used the AI enhancement feature.  I brought the enhanced image into Photoshop and cropped to the same 1600 x 1067 Pixel size.


As you can see, the difference is quite amazing.  

This is the modified EXIF Data, showing the addition of the AI Enhancement.  

2nd Year Bald Eagle
Auburn, WA, USA 04-16-21

Canon EOS 7D Mark II, EF 500mm f/4L IS II USM
ISO 250, f/5.6, 1/3200th Sec., (EFL) 800mm.
Hand Held. Cropped for Composition.
Manual Mode, Partial Metering, Auto White Balance.
Edit Flow: Selected and previewed in Adobe Bridge, Adobe Camera Raw [AI ENHANCED], with final editing in Photoshop.


I'm still playing around with AI Enhancement, but it should be obvious that this tool can work wonders for all who wish their target was closer.  I think of all the thousands of images I have squirreled away on exterior hard drives... many images taken but the subject was at an extreme range, so I decided it was not worth editing... figuring it was simply an ID image.  Some day I might even find the time to go thru a few of them.


Thursday, December 14, 2017

Quick Tip #4 How do you shoot a white bird in full sun without it being blown out???

What settings do you work with to achieve this result?

Snowy Egret (SNEG)
Salt Marsh in Rye Harbor State Park
Rye, NH 04-09-17

Canon EOS 7D Mark II, EF500mm f/4L IS USM
ISO 400, f/6.3, 1/5000th Sec., (EFL) 800mm
Hand Held, braced on truck roof, Cropped for Composition.
Manual Mode, Partial Metering, Auto White Balance
Edited in Photoshop


--------------------------


Whites are blown out in this image
Canon EOS 7D Mark II, EF500mm f/4L IS USM
ISO 400, f/7.1, 1/2500th Sec., (EFL) 800mm
Hand Held, braced on truck roof, Cropped for Composition.
Manual Mode, Partial Metering, Auto White Balance
Edited in Photoshop


How can you photograph a white bird in full sun without it being blown out? That was a question I posed to myself this past April (2017).

The image above was shot with what I consider my 'sweet spot' settings for this particular camera/lens combination.

I took some images then looked at the LCD to see how things were coming out. Even if I hadn't had 'the blinkies' on (See Manual Mode Part 1, Dated 10-14-17) I could see that the bird was blown out. Not terribly so, but when I zoomed in on the bird, I could not see the feather definition I wanted.

As you have seen from my discussion on shooting in Manual (Parts 1 & 2), there were a few things I could have done to rectify the situation.

I like to keep my ISO at 400 as I find that gives me the best color in full light. I decided my first move would be to raise my shutter speed. Less light hitting the sensor due to a shorter time the aperture stays open will cause the image to darken. I brought it up to 1/4000th Sec. As you can see by the image below, my bird was still blown out. I love the waters reflection on the underside, but I was still overexposed.
Whites are still blown out
Canon EOS 7D Mark II, EF500mm f/4L IS USM
ISO 400, f/7.1, 1/4000th Sec., (EFL) 800mm
Hand Held, braced on truck roof, Cropped for Composition.
Manual Mode, Partial Metering, Auto White Balance
Edited in Photoshop


I then tried widening my DOF (depth of field) by changing the aperture to f/10. While this does widen my DOF, it also closes down the blades in my lens, which lets in less light. I took a few images; upon checking the LCD, I still had a small area where the blinkies indicated I was close, not yet there.

I didn't want to widen my DOF anymore, so I cranked up the speed again, this time to 1/5000th Sec.
That did the trick. I got the feather definition I wanted and could still see the environment the bird was in.

'Tiptoe Across The Marsh'

Canon EOS 7D Mark II, EF500mm f/4L IS USM
ISO 400, f/10, 1/5000th Sec., (EFL) 800mm
Hand Held, braced on truck roof, Cropped for Composition.
Manual Mode, Partial Metering, Auto White Balance
Edited in Photoshop


I was lucky I was photographing birds that did not spook easily.  I was shooting from the roof, accessed thru the sunroof.  If they had flushed before I was 'dialed in', it would have been an opportunity lost.  Thankfully Snowy Egrets are almost always on the move, scaring up their meal by running around in the marsh so they are less apt to flush.


Wednesday, November 8, 2017

Motion In A Still Image

Getting a nice crisp BIF (Bird In Flight) is always nice... the entire bird frozen in space. Take this American Bittern (AMBI).  I was on it while it was hidden in the marsh grass.  I used a high shutter speed because these are skittish birds.  I was using my truck as a blind, popped up thru the sunroof.  For some reason, I'm still part of the truck to the birds.  As others stopped to see what I was looking at, some got out of their car... the bird flushed, but I was ready.

(Be sure to click on the images for full screen viewing).

American Bittern - Parker River NWR - Plum Island, MA 10-28-17

Because I had a high shutter speed already set, I was able to capture a whole series of images of the AMBI in flight with crisp details... frozen in space.

American Bittern - Parker River NWR - Plum Island, MA 10-28-17
Canon EOS 7D Mark II, EF500mm f/4L IS USM
ISO 400, f/6.3, 1/2000th Sec., (EFL) 800mm
Hand held, Cropped for Composition.
Manual Mode, Partial Metering, Auto White Balance 
Edit Flow: Selected and previewed in Adobe Bridge, 
Adobe Camera Raw with final editing in Photoshop.


It's nice, but sometimes I want to see some wing blur to give a sense of motion in the still frame.  After photographing a small flight of Dunlins coming in for a landing, I thought I would try and get some motion shots when a Dunlin takes off or another flies in, so I adjusted my settings to allow for some wing blur by lowering the shutter speed.

A flight of Dunlins fly to a mud flat at low tide - Parker River NWR - Plum Island, MA 10-28-17
Canon EOS 7D Mark II, EF500mm f/4L IS USM
ISO 400, f/6.3, 1/1600th Sec., (EFL) 800mm
Hand held, Cropped for Composition.
Manual Mode, Partial Metering, Auto White Balance 
Edit Flow: Selected and previewed in Adobe Bridge,
Adobe Camera Raw with final editing in Photoshop.

As you can see in this image, the body of the Dunlin is crisp, but the wings are nicely blurred.  I like the effect because the image screams motion... you can almost see the bird fly over the water.

A Dunlin in flight  - Parker River NWR - Plum Island, MA 10-28-17
Canon EOS 7D Mark II, EF500mm f/4L IS USM
ISO 400, f/7.1, 1/800th Sec., (EFL) 800mm
Hand held, Cropped for Composition.
Manual Mode, Partial Metering, Auto White Balance.
Edit Flow: Selected and previewed in Adobe Bridge, 
Adobe Camera Raw with final editing in Photoshop.

As Duck migration time is almost upon us, with some moving already, shutter speeds are going to need to be high if you want to freeze the action.

Common Goldeneye's in Flight - PSNH Boat Ramp - Bow, NH 03-06-15
Canon EOS 7D Mark II, EF500mm f/4L IS USM
ISO 400, f/8, 1/2000th Sec., (EFL) 800mm
Hand held, Cropped for Composition.
Manual Mode, Partial Metering, Auto White Balance 
Edit Flow: Selected and previewed in Adobe Bridge, 
Adobe Camera Raw with final editing in Photoshop.

These birds fly so fast I was surprised how little blur came out... but I still like the shot.  I believe they were about to land after a 180 turn, thus the slow speed of the birds.

Common & Barrow's Goldeneye Fly Up River - Merrimack River - Manchester, NH 01-11-16
Canon EOS 7D Mark II, EF500mm f/4L IS USM
ISO 400, f/8, 1/800th Sec., (EFL) 800mm
Hand held, Cropped for Composition.
Manual Mode, Partial Metering, Auto White Balance 
Edit Flow: Selected and previewed in Adobe Bridge, 
Adobe Camera Raw with final editing in Photoshop.

Remember, I shoot in Manual, so I can control the various functions. Remember that photography is all about handling light, and the triad of functions, as described in Part 2 of my blog post on shooting in Manual. If you lower the shutter speed, more light will be hitting the sensor and may blow out your image. Take a few shots and make sure your new settings handle the available light, or make the necessary adjustments .

One last thing: When shooting flocks, make sure you close down your aperture (go to a higher f/stop) which will widen your DOF... spreading apart those panes of glass also described in Part 2 of my blog post on Manual.
This way, the entire flock will be in focus.


Have fun duck hunting (with your cameras)!!


Friday, November 3, 2017

🔊 "You Can't Always Get What You Want...." (Rolling Stones)

This post is designed to get you to take what is offered and make it work for you.


An American Black Duck Lands in a Salt Marsh
We birding photogs strive for perfection, and will often go thru great lengths to get a spectacular image.  The most experienced photogs are usually successful in their quest.
We all are able to be successful most of the time with at least a few good images. 
However, no matter how experienced you may be, mother nature does not always cooperate.  So, when you get an opportunity to shoot the target bird in less than desirable conditions... TAKE THE SHOT!  In fact, take as many as you can while it is in view.  It may be all you get... this way you don't come back empty handed.  I have attached a couple of examples to this post.

You made it to your destination at the time you hoped.... in this case, I'm at the Parker River National Wildlife Refuge.  The lighting is perfect, temperatures are wonderfully crisp... but there are no 'cool' birds in sight.  What do you do?  I take photos of opportunity that are presented to me such as the American Black Duck landing in the middle of a golden marsh in the above image.  ABDU's are not exciting birds by themselves... but put one into a beautiful setting, and it adds to the over all landscape before you.
Take The Shot!  You don't know whats in store for you... it's nice to be able to have something to show for your day.  It's also a good way to see if your settings are good for the conditions.


If you have ever tried to photograph a Northern Harrier at the Parker River NWR, you know the word frustration.
I submit to you, that these beautiful Raptors are trained by their parents, who were trained by their parents before them how to screw with us birder/photogs.
They will pop up over the eastern tree line and swoop down into the road, maybe even tease a bit more and cruise up the road weaving back and forth... trying to entice you to act. They then pull off into a salt marsh and start their low figure-8 cruising just over the marsh grass hunting voles, mice and other little furry creatures.
Even though I know what is going to happen, I zoom up to that point and stop, the few with me all jump out and lift our cameras ready to fire. The Harrier was in close to the road when we stopped... but by the time we raise the lens, they are half way to the dike, offering a far off shot of their single white striped butt.
Another tactic of theirs is to wait for us to get out of the truck. When our lens is half way up, they turn and fly directly up into the sun, then once we are blinded, they pop back over the road above the trees on the east side of the road.

Now, I thought this was a phenomenon specific to the NOHA's at the PRNWR, and maybe even just when I'm around as there have been many wonderful images of NOHAs captured at the Refuge by some excellent birder/photogs.
However, last night I was speaking with my friend Kathie in Houston, TX. She described the very same type of teasing play of the NOHA's down in Texas!!!
After speaking with Kathie, I feel much better in knowing it's not just me!

Here is a shot that was very close towards the sun.  I knew I'd just get a dark shape but fired anyway.  I was pleased to see the crisp silhouette of the bird showing off its long tail... the longest tail of the Raptors of North America.  Yes... even longer than the Accipiters (Sharp-shinned Hawk, Coopers Hawk and Goshawk).

A nice surprise awaited me.  When I brought the image up on the computer, I saw that the primary and secondary flight feathers were glowing with the morning sun.

I think keeping some of the marsh, in this case the far dike and the hills in the distance made for a better composition of this image.  This dark, if cropped too much, the bird will most likely be noisy and thus no good.  I like to show a bird in it's habitat, so this crop works well for my style.

Female Northern Harrier (NOHA)

Silhouette of a Female Northern Harrier cruising over a salt marsh.  (NOHA)
Parker River NWR
Plum Island, MA 10-28-17

Canon EOS 7D Mark II, EF500mm f/4L IS USM
ISO 400, f/8, 1/5000th Sec., (EFL) 800mm
Hand held, Cropped for Composition.
Manual Mode, Partial Metering, Auto White Balance
Edit Flow: Selected and previewed in Adobe Bridge, Adobe Camera Raw with final editing in Photoshop.


In this next image I tried to use the rule of thirds in multiple ways for my composition.  I placed the bird at the upper LH intersection, and tried to get the top and bottom of the marsh to fit within the horizontal third lines.  The entire bird was back it by the morning sun, the rear bokeh with its wonderful white light reflections of the wet vegetation and spots of color is a nice touch, as is the front bokeh, that has some interesting color to it.  

(For a in-depth discussion of the Rule of Thirds, see my earlier post in this blog).

Female Northern Harrier (NOHA)

A back-lit Female Northern Harrier cruises over a salt marsh.  (NOHA)
Parker River NWR
Plum Island, MA 10-28-17

Canon EOS 7D Mark II, EF500mm f/4L IS USM
ISO 400, f/8, 1/5000th Sec., (EFL) 800mm
Hand held, Cropped for Composition.
Manual Mode, Partial Metering, Auto White Balance
Edit Flow: Selected and previewed in Adobe Bridge, Adobe Camera Raw with final editing in Photoshop.


So, while I didn't get that rocking image of a Harrier this time, I knew I'd have many more chances before the day was thru, as these two images were taken around 9:00 AM.


Enjoy your shooting fellow birding/photogs!!  
And remember, those not so perfect images can still be used for some very nice photography.


~Meanwhile....~


This time, waiting and watching paid off as the Harrier came back towards us with the sun at our backs... I got off a few shots before she saw our lenses.  Realizing her mistake she took off towards the trees to the east.

Female Northern Harrier (NOHA 

A Female Northern Harrier comes in close 'down sun' from our position. (NOHA)
Parker River NWR
Plum Island, MA 10-28-17


Canon EOS 7D Mark II, EF500mm f/4L IS USM
ISO 400, f/7.1, 1/4000th Sec., (EFL) 800mm
Hand held, Cropped for Composition.
Manual Mode, Partial Metering, Auto White Balance
Edit Flow: Selected and previewed in Adobe Bridge,
Adobe Camera Raw with final editing in Photoshop.


Tuesday, October 24, 2017

Photographing Sunsets


SHOOTING THE SUNSET:  When is the best time to shoot the sunset?

There is no real exact time that will give you the very best image of a sunset.  My favorite time is 'The After Sunset'.  This will give you some great color if the conditions are right.

When the sun is still up but nearing the horizon and peaking thru the clouds can also give you some excellent images.  Some can even have a sweet sunburst.   See Photo #2


Over and beyond Lake Winnisquam - Laconia, NH 06-19-13 

'Sun Sets Over Lake Winnisquam'

As I was shooting the 'after sunset' across the southern portion of Lake Winnisquam, each mountain range taking on its own hue, a Great Blue Heron flew by high over the water.  

A wonderful peaceful moment I shall remember for many years to come. 

Over and beyond Lake Winnisquam - Laconia, NH 06-19-13 


Sunset from the Oak Hill Rock Outcropping - Concord, NH 11-14-14
Reworked slightly in Photoshop on 08-22-16


The best time to shoot a sunset (my personal opinion) is after the sun goes all the way down.  That's when the real show starts!  I see so many people... just about everyone, photograph a wonderful sunset.  I occasionally set up at the end of a bridge as I often like to shoot across water, and the elevation can add depth.  One time, upwards of 50 cars stopped along a bridge over the Merrimack River at a sunset shoot I was at.  People with cameras from nice DSLR's to cell phones ran to the railing to capture the moment.  I just sat on the hood of my truck, enjoying the moment.

As soon as the sun dipped beyond the horizon everyone left. I may take a few images while the sun is going down... but my equipment is set up for the real beauty that comes shortly after the sun is gone... if the conditions are right, it can be unbelievably beautiful. It is almost always a treat and worth taking the time to see what nature has in store for you! I was the only one there; follow the link below to see what they all missed out on.
(If you click on the first image, then drop the sales box in its upper LH corner.  You can also drop the image scroll using the arrow bottom center.  From there you can use your arrow keys to scroll thru the images).


As for settings, I start out with fairly normal settings, then reduce the f/stop and shutter speed as the light fades.  (ISO 400, f/6.3, 1/1600th. Sec.)
It's beneficial to be tripod mounted so you can really drop the speed, but as long as you stay over 1/640th, Sec., you should be fine hand held.

I keep telling myself I should be on tripod... but I don't.  I probably should follow my own advice.

One thing to remember when shooting at very slow speeds.  If you take the photo by depressing the shutter, you will get a very slight blur from camera shake.  Thus a remote would be needed.  I have a RF Remote.  RF over IR is an important distinction.  Infra Red models are cheaper, but you need a clear line of sight to use it.  The RF release unit can stay in my pocket when I shoot.

If you find your self in this situation but do not have a remote, use the built in timer in the camera.
There are 3-second and 10-second timers.  Do not use the 3 second as you want the camera rock steady... 3 seconds is not enough time.


Sunday, October 22, 2017

Quick Tip #3 [GEAR] Save the lens mount on both your lens and camera body.

I have seen a number of people with the new 150-600mm offerings using the camera strap attached to the camera body, with the entire unit slung over the shoulder.
These lenses are not light.  If you continue to do this the weight of the lens will wear the attachment points.  Eventually the lens will not stay attached to the camera.

You should always hold your camera/lens by the lens barrel or tripod foot.

Large mm lenses have tripod mounting feet.  There are 1/4-20 threaded holes in these feet designed to use different types of tripod mounting hardware.

Many aftermarket strap slings are available.  Many use a lug with a 1/4-20 thread designed to screw the sling attachment to the bottom of a camera.
Use this by screwing it to the lens foot.

I highly recommend you rig a 'leash' from the camera body to the lens.  If you inadvertently hit the lens release you might not know it until your camera hits the rocks at your feet.  My leash has save camera bodies multiple times, the most recent out on a trail survey just yesterday.

~~-----------------~~

I like and use a product by Peak Design called Slide.  I have a few of these and use them all the time.  What I like most about the slide is the ability to change the length of the strap in seconds, thus adjusting where the camera rides on my body.  The products of Peak Design are top quality and many of them are in my 'bag of trick's'.

What I like most about Peak Design is their attachment point design.  It is a very sturdy quick release system that will not come apart unless you do it yourself.

While on Peak Design products, my favorite item of theirs is the Clutch.  This is a hand strap mounted on the side of the camera that allows me to hold and shoot the camera with one hand (using a small lens).  It also helps me stabilize the unit when hand holding my 500mm monster.

The Clutch is wonderful when using a monopod, giving you the ability to shoot with one hand on the camera, the other out on the lens steadying the unit.  It also allows me to shoot one handed when tripod mounted.

I have a clutch on each camera body I own.

***10-27-17  UPDATE


I have been asked by a few people what the leash is I have been talking about.
Here is an image of my 7D Mark II with the 500mm on it.
Note there is a second attachment point. I have one on each side, on the 2 main bodies I use. When using smaller lenses I attach the Slide Strap to the camera. I will sometimes take it off when the body is on the 500mm and attach the leash. I take it off so I don't accidentally sling that strap across my shoulder. I have a dedicated strap on the 500mm that stays there.
I actually own two of the Peak Design Slide Straps. Very handy to have.

Using another product from Peak Design, I am able to quickly remove the leash when removing the body for use elsewhere.

Friday, October 20, 2017

MANUAL MODE (PART 2); Taking The Fright Away From That Scary 'M'

In Part-1 I discussed the basic camera settings.  Here in Part-2 I am going to be concentrating on the three main settings you will use in manual when shooting.  The BIG 3; ISO, Shutter speed & Aperture.  These are all interconnected.  Change one and you lighten or darken the image.
The important thing to remember when lightening your image is that each of these has an immediate and predictable side effect.
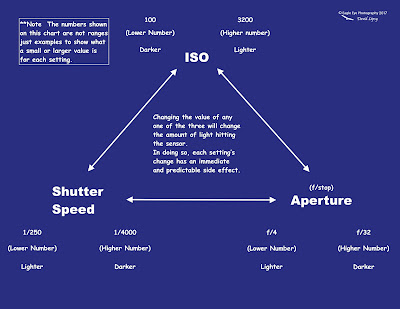
Click on image to read full sized


ISO

Raise the ISO, and depending on the camera body, you will soon reach a point where the image is very noisy.

American Wigeon - Exeter WWTP - Exeter, NH 09-23-16

Noise is the digital equivalent of grainy in film images.  There is not enough digital data to properly fill in all the pixels, so it leaves a lot of 'holes' in the image.  This occurs most in the darker areas.
In the image above, it was a dark day and getting late.  I knew it was going to be a noisy shot, but I wanted to try anyway.
When editing a noisy image, there are items in many programs that can help smooth over the noise, but it can only go so far.  It will also take away the crispness of the shot.


(Shutter Speed)

Lower the shutter speed and you will soon reach a point where any movement of the subject or shake by you will result in a blurred image.
In future discussions, you will see that sometimes I like to lower the speed to get blur in the wingtips of birds in flight.  The speed needed will change based on species.  Think how fast a ducks wingtips are moving verses the tips of a Bald Eagle!

Common & Barrow's Goldeneye Fly Upriver - Merrimack River - Manchester, NH 01-11-16

Note the wingtips on most of these Goldeneye.  The blur gives a sense of motion to the shot. If you catch a birds wings at the high or low point, for a fraction of a second it slows down then reverses, thus will most likely not produce the blur wanted.


(Aperture - f/stop)

Changing the aperture, or f/stop to a lower number will tighten up your DOF (Depth of Field), possibly coming to a point where your subject is blurry on the back half.  Or both in front and behind.
Think of DOF as being 2 huge panes of glass.  The smaller the number, the wider the aperture of the lens opens up letting in more light, but brings those 2 panes of glass very close together.  Anything outside those panes will not be in focus.
As you adjust to a larger f/stop, the aperture of the lens begins to close down and the panes of glass begin to move away from each other, thus giving you a WIDER DOF.
I like to shoot with a tight DOF, but sometimes I need to change this to get the shot; to me it's better than noise and better than a blurry image.

American Golden-Plover - Rye Harbor State Park - Rye, NH 11-11-16

Take a close look at the image above this.  What do you notice about the bird?  Its tail feathers are not in focus.  When I shoot birds, I always target the eye.  This bird is around 10-1/2" long.  Since I am targeting the eye, half of the focal plane will be in front of the eye, and half behind it.
For this discussion, lets assume that half of the bird is in focus.  Since we know the bird is 10-1/2", we can say that the DOF at the settings for this image is 10-1/2".  5-1/4" in front of the eye, and 5-1/4" behind it.
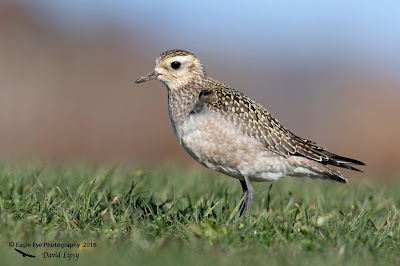
American Golden-Plover - Rye Harbor State Park - Rye, NH 11-11-16

Take a close look at the image above this.  What do you notice about the bird now?  The entire bird is in focus.  I did not change any settings from the last image to this one.  The only difference is that the bird turned.  When it was parallel to end glass of the lens I took the shot.  The entire bird is in focus because I was able to catch an image with the entire bird in the focal plane.

Notice the grass in the two images; you can see that the grass in front as well as everything behind the bird is out of focus.
If I had needed to lighten up the shot, and chose to use a smaller f/stop (Wider aperture thru the lens), the glass panes would have moved even closer together.  Less of the bird in the top of these two images would be in focus.  In both images, the grass in focus would be less as well.


(Viewer Display & The Key To MANUAL)


I would like you to practice adjusting the three settings while holding the camera up to your face.  Use the information in the cameras view finder to watch the selection as you adjust.
You should practice this often, until you are able to adjust all three just by thinking about it.

The key to all of this, and to me the Key To MANUAL is the center section which is a light meter.
Every camera is different, even within manufacturers.
The above viewer display I took from my Canon 5D Mark III.  Regardless of what is located where, you should have an indicator for the big three settings and a light meter.


(Sweet Spot)

When I get to a location, the first thing I do is look at the conditions.  If its a nice sunny day, I set the camera to what I consider my sweet spot.

ISO 400, f/6.3, 1/2500th Sec.

Once these are set I put the camera to my face, depress the trigger halfway then point the lens all over while watching the light meter.  There is a line in the above diagram under the number 1.  This is the light indicator.  It moves across the meter telling you where your lighting is before you take the shot.  Sometimes it's not there... usually because I need to brighten as the indicator is off the chart to the left (-) side.  With nothing but a protection filter on my lens, I want the light to be around -1, which is where I put the indicator in my diagram.  I noticed in a recent field experiment, that when I added a polarizing filter, the images I liked best were taken when the meter was at 0 for the same settings.

When I am done searching out the highs and lows of light in the areas I think I might shoot towards, I point the lens at the darkest area.  If it registers say, a -2 1/2, I might reduce the shutter speed to 2000.  That might have helped a bit.  If not, I would allow this to go down to the next value, 1600.  I don't want to go any lower.   I'm still not light enough so what do I do?  Adjust the f/stop to a smaller number.  If I am shooting my 500mm, which is an f/4, I would have a few values to go before I hit f/4.  If I hit f/4 and it's still not bright enough, I need to stop and asses the situation.  What am I shooting here... or at least hoping to shoot.  If I believe I am in an area to capture a big ole' Bald Eagle lumbering along above a river, I might allow 2 more values removed on the shutter speed which would bring it down to 1000.  If that does not do it, I will then, and only then (usually), I will reach for the ISO.  While it would have been easier to just adjust the ISO, which is what the camera algorithms would have done, it might have required going up to ISO 2500, 3200 or even 4000.  In this particular case, with the 5D Mark III, I would still take the shot at 4000, but try to stay at least 3200 or lower.  The 5D III is awesome dealing with noise.
On one of my other cameras, a Canon 7D Mark II, when I got to the point where I had to adjust the ISO, I would not bring it up over 800.  I will shoot 1000, but not comfortably.  Anything more and you will have noise in your image.  I would say that this is going to be what you face as most of us have crop frame cameras for birding.
The 5D III is a full frame machine that rocks in so many ways. FPS (frames per second) is not one of them.  I also loose the 1.6x built in multiplier when using 'L' Series glass that all Canon crop frame cameras have.  I use this body for everything except birding.

Once I have this set up, I have a good starting point.  If a Bald Eagle flies by, well, I had better hope I didn't mess up my settings because I don't have time to adjust to the BIF before I fire as I want a shot of it heading inbound.  I will however glance down at the light meter... if it is past 0+, or lower than 1-, I will adjust the shutter or aperture and hope I can still get off a few frames on the face of the bird.


And thats it!  You will quickly get used to shooting this way and wonder how you ever managed a good image before.
There are many other ways to get a great image... but this is what I consider to be the best option.


MANUAL;  Yeah...... I got that.